 MOL Management
|
<< Click to Display Table of Contents >>
|
  
|
Rich Internet Applications
Closing Screens
Except for the Navigation screen, pressing Esc anywhere in a screen will close the screen. To Close the Navigation screen and close your session you need to click the Close button.
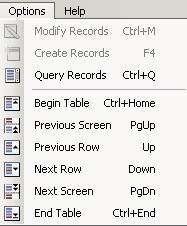
Screen Navigation
For multi line screens you can use the icons located at the top of the screen to browse through a list of transactions, or you can use the key sequences as listed in the second graphic.
![]()
Accessing Buttons
You can click directly on the buttons or you can use a quick key function by using Alt + the underlined character on the button.
Alt+P would activate the Print button.
Alt+G would activate the View GL Trans
F5 would activate the View Transaction button.
![]()
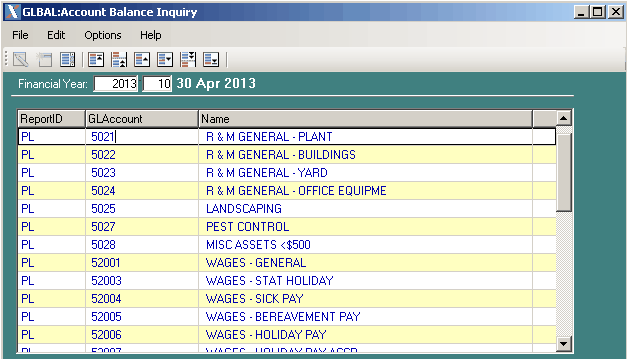
Using Incremental Locate
On columns that you can tab to, and high lighted in blue, you can locate a record by typing the required key sequence. For example to locate Account 5028, type 5028. If in the Name column type MISC.
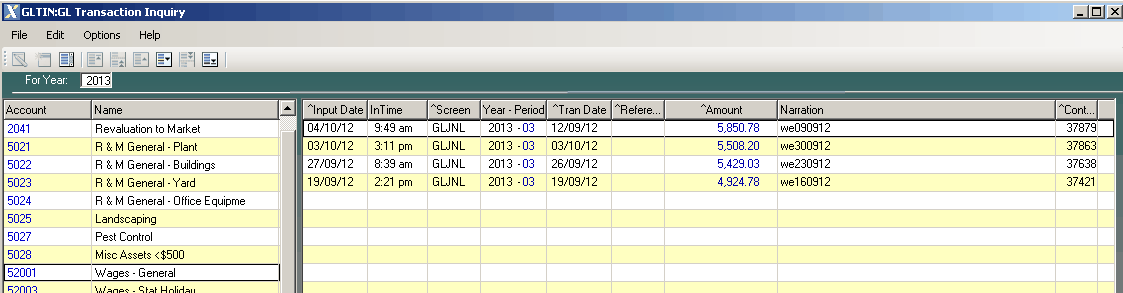
Screens with Multiple Forms
This screen has 3 forms, the For Year: the list of Accounts and the list of Transactions matching the selected Account.
From the Account form you can Tab or Enter to the Transaction form. However you need to use the mouse to click back into the Account form or back to the For Year: form.
If you use Esc from anywhere in the screen the screen will close.
Running Reports
Reports are returned as a .pdf in a Browser window from where you can view, print or save the .pdf to your local hard drive.
User Accounts
Browse Users
This screen was designed to give you a brief overview of all your users that have access to a Maxim Online Database. From here you can see what Database and Company the user directly logs into, you can see the status of the user and you can see if there are any unactioned change requests. (Change Requests are explain further on in the document).
All the columns are sortable to enable you to quickly locate the user you are after.
You can type in either the User Account or Name columns to find a user.
1. Statuses
New A New user account has been requested by one of your Administrators, but has not
been actioned by a Maxim Help Desk member.
To Be Checked The user account has been created and the request passed on to another Maxim
Help Desk member to review and complete the setup of the user account.
Current The account has been setup and is ready to use or is currently in use.
Disabled The Maxim help desk has received and actioned a change request to delete / disable
the user account.
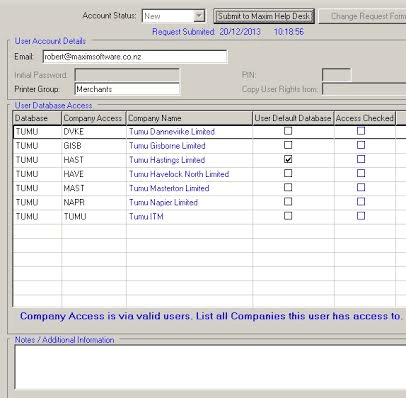
New User Account
Depending on what settings are set for your Maxim Online Management account depends on what fields we require from you. There are however some fields that are required by all users.
Name: is a required field. Please enter the user’s full name.
User Account: is a field required by some clients. If this is not required by you the Maxim Help Desk will completewith your User Account Code.
Email: is not a required field. However if the user does have a company email address please enter it as it helps with Help Desk requests.
Initial Password: is a field required by some clients. If this is not required by you the Maxim Help Desk will complete with your initial password.
Printer Group: is a field required by some clients. If you as a client uses the Maxim Online Print Server you will be
required to select a printer group from the F5 list.
PIN: is not a required field. Some client’s like the Maxim Help Desk to set their users PIN’s if you would like a PIN set
please enter it.
Copy User Rights from: is not a required field. Some clients like us to set the Maxim users rights for new users, we
have provided the facility to be able to select a user to copy the rights from.
User Database Access: are required fields. This is where you tell us what database and company the user has access
to. For the company that the user first logs into you must tick the “User Default Database” field. If your
database has multiple companies and the user requires access to these you must list them out. If you only have 1 database and 1 company, you will notice the fields will be automatically completed for you.
Notes: is not a required field. If there is information about the setup of this user account that is not
included in the fields above please give a brief description. E.G: This user account needs to be setup
by a certain date, or this user also requires a mobile / handheld device user account.
After you have completed the fields for the new user, press the Submit to Maxim Help Desk button, which will provide the Maxim help desk with an email alert.
2. Change Request Form
Once the account has been setup and the status changed to Current, the Change Request Form button will be activated. Here you can provide a brief description of what you would like changed for this user. It could be that this user requires access to other databases or companies etc. Once you have finished the change request please press the Submit to Maxim Help Desk button, this will provide the Maxim Help Desk with an email alert.
Once the request has been completed the actioned tick will be activated and the user account details updated.
For a new change request for press F4.
User Accounts Report
This is a PDF report with the option to export the data to a CSV spread sheet if required.
You can either select a database to export users or leave the field blank to export users for all databases.
The CSV spread sheet will be emailed to the email address we have on file for you.
Printer Management
Here you can request a new printer to be setup.
Printer Name: This is what you have named the new printer on either your Print Server or the Local Computer.
Model: This is the new printer Model not the driver Model.
Driver: This is the driver name / details.
Driver URL: You have the ability to paste a link to the driver.
Note: Maxim runs a Windows Server 2008 R2 64 bit terminal server environment; the drivers need to be able to be Installed on this operating system.
If you use the Maxim Print Server there are other fields for IP addresses and Ports which need to be completed.
Once you have finished the request please click the Submit Printer Request button, this will provide the Maxim Help Desk with an email alert.
Inactivity Timeout
Your current session will close after 120 minutes of no activity.
Support
For technical support please contact the MaximOnline helpdesk on 07 350 1174 or by email helpdesk@maximsoftware.co.nz