|
<< Click to Display Table of Contents >> PBDES PBT Despatch Centre |
  
|
PBDES PBT Despatch Centre
|
<< Click to Display Table of Contents >> PBDES PBT Despatch Centre |
|
ROC / User | Inquiries | PBT Transport |Despatch Centre
There are 2 areas to the despatch centre.
| 1. | Runs – Runs are the consignments being loaded onto the truck. |
| 2. | Consignments – Consignments are the actual Invoices being despatched. |
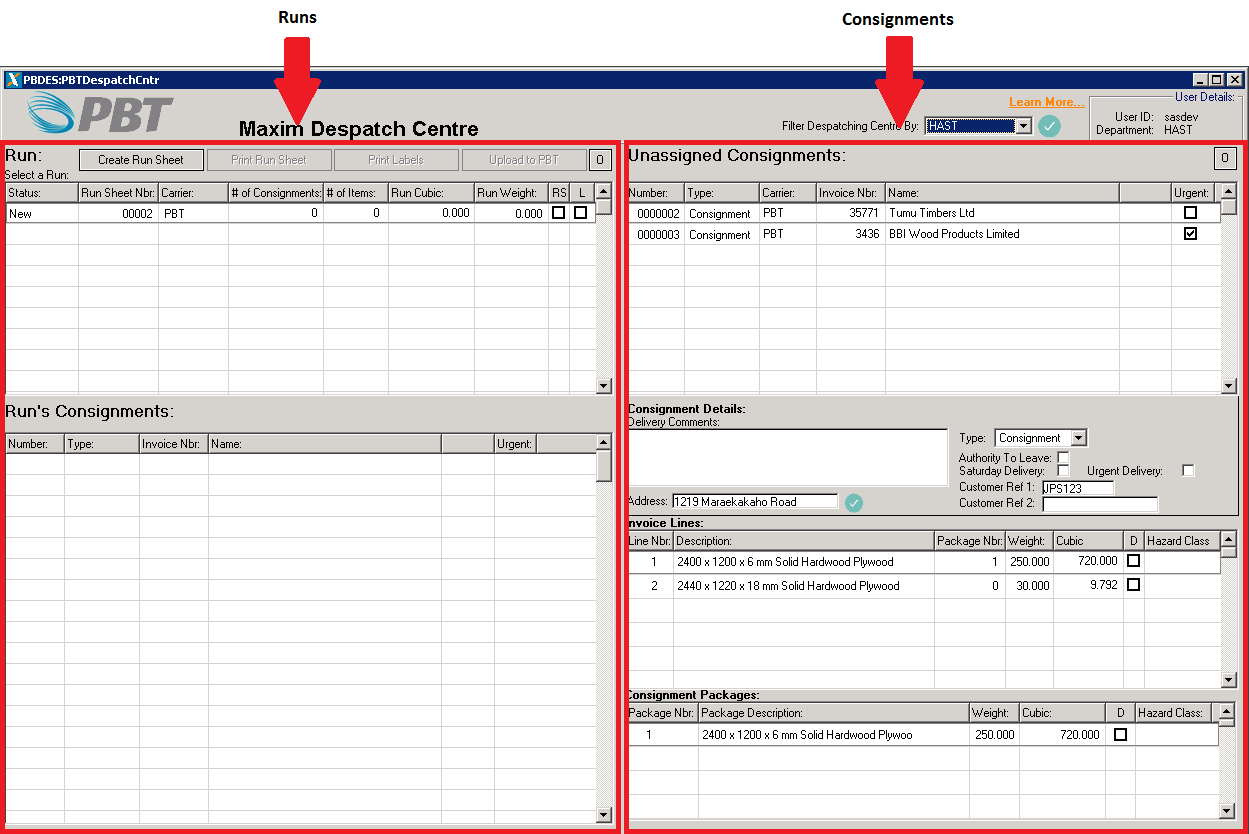
Consignments Area:
Consignments directly relate to either an Invoice or a Despatch in Maxim. (Click here “add link here to creating consignments help article” to learn more about creating consignments.)
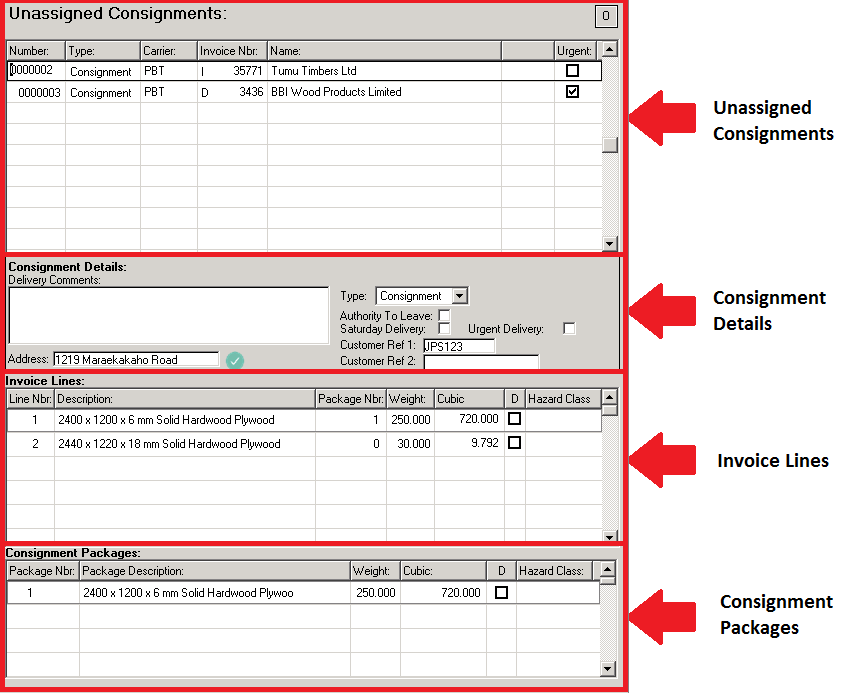
There are 4 areas to the consignments side:
| 1. | Unassigned Consignments |
| 2. | Consignment Details |
| 3. | Invoice Lines |
| 4. | Consignment Packages |
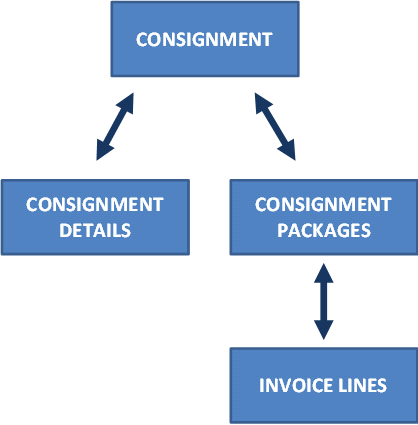
The below image shows how each area relates to the overall consignment:
Unassigned Consignments:
When consignments are first created they are listed in the Unassigned Consignments list.
Here you select the consignment you would like to work with.
Consignment Details:
Consignment details is where you to enter information about the consignment.
-Delivery Comments: This allows you to put a message or special delivery instructions on the label to included in the digital file sent to PBT.
-Address: This is the physical delivery address for the consignment, this comes from the delivery details of the invoice or despatch. You can F5 on this field to view / adjust the delivery address information.
The green tick next to the address indicates the address has been validated against the PBT locations database information held on file.
If it has a red tick next to the address, this indicates the address does not match a location in the PBT locations database. You need to F5 on the address field and go through the address validation process.
-Type: The type will automatically be completed based on what is set in the settings screen. You can change this option to either Consignment or Pak depending on what you are sending.
-Authority to Leave: If the consignment can be left at the delivery address without getting a signature or anyone being there, tick this box.
-Saturday Delivery: If you would like the consignment to be delivered on a Saturday tick this box.
-Urgent Delivery: Tick this box to notify PBT that this is a high priority delivery.
-Customer Ref 1 & 2: These boxes allow you to put information on the label for the customer. Customer Ref 1 will automatically be completed if a customer reference has been entered on the invoice or despatch.
Invoice Lines:
These are the lines from either the invoice or despatch. Here you assign what lines are going to what package by entered a package number in the package number field.
E.G:
Invoice Line 1 = Package 1
Invoice Line 2 = Package 1
Invoice Line 3 = Package 2
Invoice Line 4 = Package 3
If the product has the weight, cubic, dangerous goods and hazard class setting set in the product maintenance, then these fields will be calculated for you based on the quantity on the invoice / despatch.
You can override the weight and cubic fields if necessary.
F5 in the Hazard Class field to select the class from the standard table.
When you assign the package number you will see these package’s be created & updated with the weight and cubic values. The dangerous goods and hazard class fields will also be updated.
The data in individual invoice lines is not sent to PBT.
Consignment Packages:
The consignment package line is the data sent to PBT. As explained under the Invoice Lines information, lines are automatically created from the invoice lines. You can override this information if necessary.
F5 in the Hazard Class field to select the class from the standard table.
Run’s Area:
There are two areas to the runs:
| 1. | Runs |
| 2. | Runs Consignments |
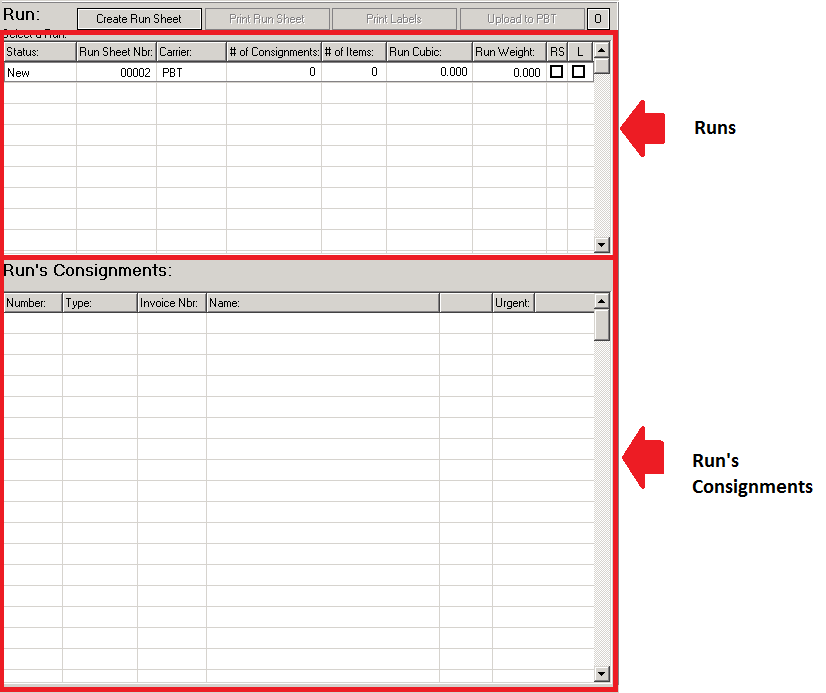
Runs:
A run is created for each truckload despatched. Different runs are created for PBT (Transport) or PBTC (Couriers).
You assign a consignment to a run by dragging the consignment from the unassigned consignments area to the run you wish to allocate it to. Maxim will then go through a validation process making sure the consignment has been completed correctly. If the consignment meets all the validation checks the consignment will be added to the run.
If you need to make changes to the consignment, simply drag the consignment back to the unassigned consignments area, make the changes and then drag back to the run.
However, Once the run sheet has been printed you will be unable to drag the consignment back to the unassigned consignments area. You can see if the run sheet has been printed if there is a tick in the RS column.
When the labels are printed the L column will be ticked.
The upload to PBT button uploads a digital copy of the run and attached consignments information to PBT. The run status will then automatically be updated to closed and removed from the despatch screen. This run will now show on the closed despatches screen.
Options:
If you need to reprint the run sheet or labels, press the O button where you can select Reprint Run Sheet or Reprint Label buttons.
Run’s Consignments:
When a consignment has been dragged across and attached to a run, they will show up under the Run’s Consignments list.