|
<< Click to Display Table of Contents >> PUORDER Inventory Purchase Orders |
  
|
PUORDER Inventory Purchase Orders
|
<< Click to Display Table of Contents >> PUORDER Inventory Purchase Orders |
|
This screen allows both inventory and non inventory items to be ordered and subsequently processed via the receipting screen.
When a non inventory item is selected, the cursor will position on the Item description field enabling the correct description to be entered.
For Indent type orders a non inventory item code has to be used, for example INDENT. Consider also creating these non inventory items using the supplier code as the item code.
Purchasing history is available and may be of use.
When this screen is called from the SAOE:Sales Order screen, open orders for the Customer will able to be displayed. The customer code is shown in Cust/JobNbr field.
Dept
The default Department is from the Department setting for the User (SYUID:Maintain Users) accessing this screen. The delivery address is from the department selected.
Alloc To Job
| • | You can only enter a job when in Create mode, that is when you initially create the line. To allocate the item to a job. |
| • | From the AllocToJob column <F5> to select the required Job. |
| • | If a New Job is required, from the JCJOBB:BrowseJobs screen press New Job or <Alt + N>. |
Complete the JCJOBM:Maintain Jobs screen to create a new job.
NOTE: the Charge To should be the customer the goods are to be charged to. This new job can now be selected.
| • | Complete the Ordered and UnitPrice columns as normal. |
Charge Rate Calculation
A charge rate is selected based on the following logic and priority. Any price entered here will become the charge price in the APRECPT screen.
| 1. | The Unit Charge Rate for the activity code. |
| 2. | Using the normal sale pricing logic, an item price will be selected based on the customer's price type for the job. Any inventory markup for the job will be added to the price. If a promo or customerised price is selected, any inventory markup for the job is ignored. |
Customerised discounts will be selected.
| 3. | When a price has not been selected, the Charge Rate will be the Unit Price plus the appropriate markup for the job. For a material transaction (JM), the material markup is applied. For a sub contract transaction (JS), the sub contracts markup is applied. |
Changing the value
| 1. | Edit the field directly OR |
| 2. | Activate the Verify Price Selection screen using the Job Price button. |
| 3. | To change discounts use the Job Price button. |
From the Item Inquiry screen, inventory items allocated to a job shown as allocated stock.
From the Job Inquiry screen, items still on purchase orders can be viewed.
This field can be skipped if required. Refer to Purchasing Options.
To Remove a Job
You must delete the line. (Duplicate the line with the Alloc To Job blank, if the line is still required, and then delete the line with the job.)
To Add a Job
Duplicate the line and enter the job in the Alloc To Job field, then delete the original line.
Loc (Stock Location)
The default Location is from the Location setting for the User (SYUID:Maintain Users) accessing this screen. Changing the Loc for a purchase order line will change the Loc default for the remaining PO lines.
Default Unit Price
The Unit Price that is selected will be either:
The item's last cost if there is one OR ...
The item's standard cost if there is one OR ...
The item's moving average cost..........
Note that the item's last cost is only created when a product receipt has been authorised for payment.
Special Sale Issue Units
If an item is sold using special sale issue units, access to the Special sale issue units field is available. The use of this field has the following features:
Sales can be by:
1. |
Serial number or Packets |
Sell Type |
= |
PA |
2. |
Lengths from Packets |
Sell Type |
= |
LE |
3. |
Lengths from loose stock |
Sell Type |
= |
LO |
If the selling Stock Location does not have serial number or packet tracking the input options are:
To enter a packet number, enter PA
To enter lengths, enter LO
If the selling Stock Location is controlled by serial number or packet tracking the input options are:
To sell a complete packet, enter PA
To sell lengths from a packet, enter LE
To select packets or to enter packet or loose lengths, <F5> from the Special sale issue units field.
For Loose lengths (LO) the total length to be invoiced can be entered directly into the Qty column. However, to record the length and pieces sold, <F5> from the Special sale issue units field.
Once pieces are entered for a sale you must always Zoom to the Maintain Pieces screen in order to change the Qty.
Refer to Sales/Despatch Options for setup information.
Item Description
When printing the Purchase Order, the Item Description field is used to combine multiple PO lines of the same product to one line on the Purchase Order. If you require multiple PO lines of the same product to print separately on the Purchase Order then you need to change the Item Description slightly by appending say 1, 2 etc to the description for the multiple lines.
Confirming Order
A purchase order becomes "Confirmed" when the order is printed.
Once confirmed, if a line is changed or added you will be asked to confirm the change and re-print the order.
Change Supplier Code
Until the order is confirmed the supplier can be changed directly from the Supplier field.
If the order has been confirmed, and until a product receipt is made against the order, the supplier can be changed by accessing the Chg Supplier button.
Open a Closed Order
| 1. | Click Set to Upd to put the order into modify mode. |
| 2. | Enter your User ID in The Ordered By field. |
| 3. | Go to the lines and make the required changes. |
| 4. | When you exit from the order, the order will be changed to Open and will list in the Open Purchase Orders screen. If not changes are made to the order lines, the order will remain closed. |
How to keep a Purchase Order Open
To keep a purchase order open go to the Sup NonRestrict tab of a supplier and tick the option to keep PO's open.
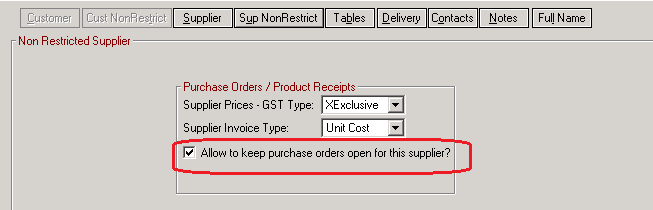
On a purchase order the 'Keep PO Open?' tick box option appears for the supplier. Tick this option to keep the PO open.

To close the purchase order the Keep PO Open? Option will need to be unticked.